[Server 샘플 링크] : https://github.com/leewoopyo/ssl_sample/tree/master/ssl_sample_server
GitHub - leewoopyo/ssl_sample
Contribute to leewoopyo/ssl_sample development by creating an account on GitHub.
github.com
[Client 샘플 링크 : https://github.com/leewoopyo/ssl_sample/tree/master/ssl_sample_client
GitHub - leewoopyo/ssl_sample
Contribute to leewoopyo/ssl_sample development by creating an account on GitHub.
1. Server의 설정파일(application.yml)에 SSL 설정 추가
Server어플리케이션의 application.yml 파일에 아래와 같이 설정 추가(ssl_sample.jks가 잘 있는지 확인)
빌드(mvnw clean install -DskipTests) 후 다시 Linux에 업로드
server:
  port: 8080
  ssl:
    enabled: true
    protocol: TLS
    key-store: /application/ssl_sample/ssl/ssl_sample.jks
    key-store-password: changeit
    key-alias: ssl_sample
    enabled-protocols:
    - TLSv1.1, TLSv1.2
2. curl명령어로 SSL 통신이 잘 동작되는 지 테스트
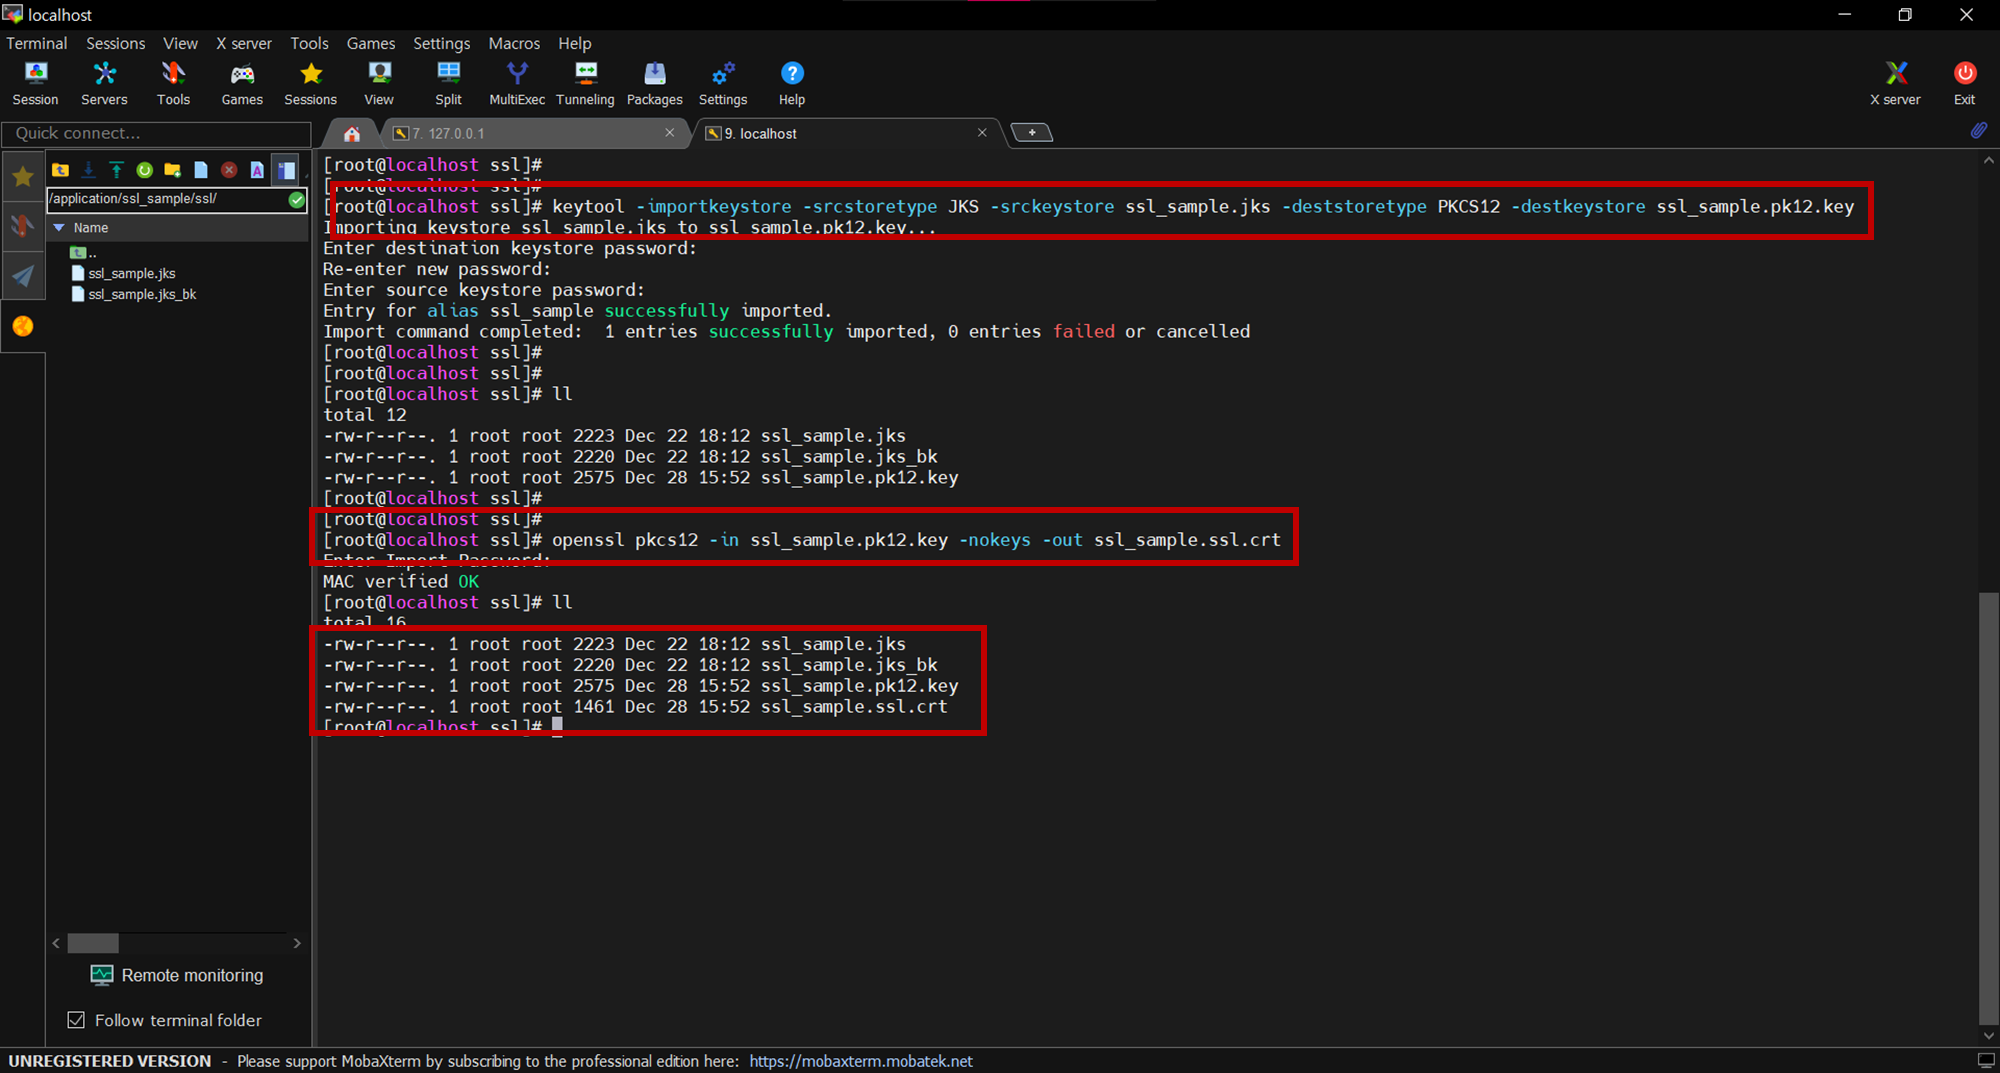
먼저, curl명령어로 통신이 가능 할 수 있게 jks파일을 pkcs12 타입의 key파일을 만든다.
keytool -importkeystore -srcstoretype JKS -srckeystore ssl_sample.jks -deststoretype PKCS12 -destkeystore ssl_sample.pk12.key
그 다음 생성한 pkcs12 key 파일에서 crt인증서 파일을 추출한다.
openssl pkcs12 -in ssl_sample.pk12.key -nokeys -out ssl_sample.ssl.crt
curl -v --cacert /application/ssl_sample/ssl/ssl_sample.ssl.crt https://mylocal.test.com:8080/api/server/ssl/test?echoParam={요청 파라미터}
명령어로 curl 테스트 진행

3. Client에 SSL 설정 추가 및 소스에 있는 URL을 https로 수정
Client의 설정파일(application.yml)을 아래와 같이 수정
server:
  port: 8081
  ssl:
    enabled: true
    protocol: TLS
    key-store: /application/ssl_sample/ssl/ssl_sample.jks
    key-store-password: changeit
    key-alias: ssl_sample
    enabled-protocols:
    - TLSv1.1, TLSv1.2
http 요청을 보내는 java파일에서 주소를 https로 수정
package com.example.ssl_sample_client.api.client;

import org.apache.http.Header;
import org.apache.http.HttpEntity;
import org.apache.http.client.methods.CloseableHttpResponse;
import org.apache.http.client.methods.HttpGet;
import org.apache.http.impl.client.CloseableHttpClient;
import org.apache.http.impl.client.HttpClients;
import org.apache.http.util.EntityUtils;
import org.springframework.http.HttpHeaders;
import org.springframework.web.bind.annotation.GetMapping;
import org.springframework.web.bind.annotation.RequestParam;
import org.springframework.web.bind.annotation.RestController;

@RestController
public class HttpClient {

  @GetMapping(value = "/api/client/ssl/test")
  public void httpCall(@RequestParam String clientValue) {

    CloseableHttpClient httpClient = HttpClients.createDefault();

    try {
      //요청 주소 세팅
      String url = "https://mylocal.test.com:8080/api/server/ssl/test?echoParam=" + clientValue;
      System.out.println("=== url ===\n" + url);
      HttpGet request = new HttpGet(url);

      //Header 값 세팅
      request.addHeader("custom-key","wplee");
      request.addHeader(HttpHeaders.USER_AGENT,"Googlebot");

      //Http 요청
      CloseableHttpResponse response = httpClient.execute(request);

      //응답 결과 출력
      try {
        System.out.println("Protocol Verstion   : " + response.getProtocolVersion());                // Protocol Version : HTTP/1.1
        System.out.println("Status Code         : " + response.getStatusLine().getStatusCode());     // Status Code : 200
        System.out.println("Status Message      : " + response.getStatusLine().getReasonPhrase());   // Status Message : OK
        System.out.println("Status              : " + response.getStatusLine().toString());           // HTTP/1.1 200 OK

        for (Header header : response.getAllHeaders()) {
          System.out.println("Http_Header_Name    : " + header.getName());
          System.out.println("Http_Header_Value   : " + header.getValue());
        }

        HttpEntity httpEntity = response.getEntity();
        if (httpEntity != null) {
          String result = EntityUtils.toString(httpEntity);
          System.out.println("=== result === \n" + result);
        }

      } catch (Exception e) {
        System.out.println("Exception #1");
        e.printStackTrace();
      }

    } catch (Exception e) {
      System.out.println("Exception #2");
      e.printStackTrace();
    }

  }

}
이후 빌드(mvnw clean install -DskipTests) 후 다시 Linux에 업로드
4 Java의 keystore(cacerts)에 서버 인증서 등록
Client 어플리케이션은 자바 기반의 어플리케이션이기 때문에 소스상에서 https 통신 시 Java에 등록되어 있는 인증서 정보를 확인하게 된다.
따라서 Java의 Keystore에 내가 발급한 서버의 인증서를 등록한다.
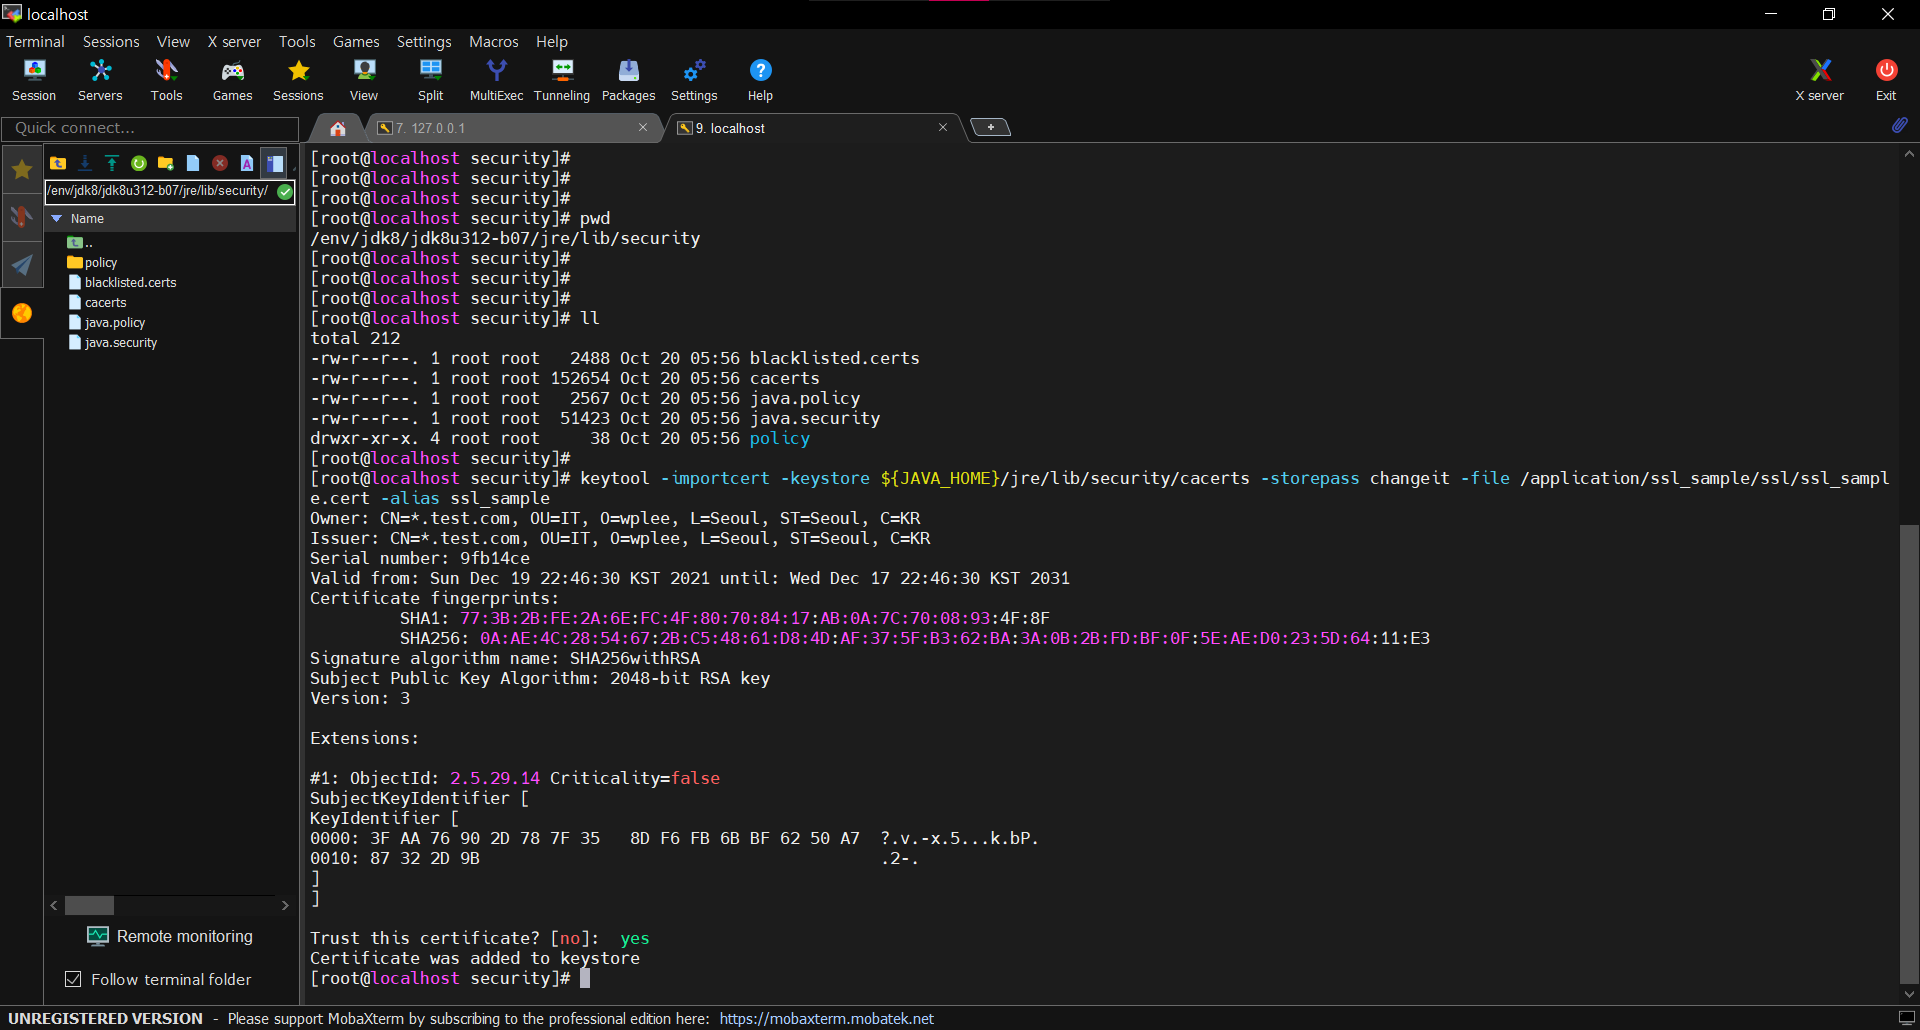
먼저, Java가 설치된 위치와
Linux 서버에서 which java 커맨드를 입력하면 Java가 설치된 경로가 나타난다.
Jdk가 설치된 경로에서 추가로 /jre/lib/security 경로로 들어가면, cacerts라는 keystore 파일이 나타난다
이 cacerts파일에 인증서를 등록하면 된다.

내가 발급한 인증서 파일(ssl_sample.jks)에서 인증서 파일을 추출
keytool -exportcert -keystore /application/ssl_sample/ssl/ssl_sample.jks -storepass changeit -file ssl_sample.cert -alias ssl_sample
명령어를 입력하여 ssl_sample.cert 파일을 생성

생성한 ssl_sample.cert 파일을 java의 cacerts에 등록
keytool -importcert -keystore ${JAVA_HOME}/jre/lib/security/cacerts -storepass changeit -file /application/ssl_sample/ssl/ssl_sample.cert -alias ssl_sample
명령어를 입력
인증서가 잘 적용 되었나 확인하기 위해서
keytool -list -v -keystore ${JAVA_HOME}/jre/lib/security/cacerts -storepass changeit | grep ssl_sample -A 20
명령어를 실행

5. curl 명령어로 호출해서 Client ~ Server 통신이 잘 되는지 확인
server, client 실행이 되었는 지 확인 후
curl -v --cacert /application/ssl_sample/ssl/ssl_sample.ssl.crt https://mylocal.test.com:8081/api/client/ssl/test?clientValue=12345
명령어를 실행하여 Server와 통신하는 Client Api를 호출

'네트워크' 카테고리의 다른 글
| [DNS] 가비아에서 도메인 구입 (0) | 2024.03.02 |
|---|---|
| [SSL, TLS] SSL, TLS 이란 (0) | 2021.12.29 |
| [SSL_Sample] 2. 테스트용 api 생성 (0) | 2021.12.27 |
| [SSL_Sample] 1. keystore 생성 (0) | 2021.12.22 |
| [SSL_Sample] 0. SSL 통신을 위한 테스트 준비 (0) | 2021.12.22 |